Saturday, 30 August 2008
Wrap Card for a Baby Girl
This design for the card comes from the extremely talented Louise. It stemmed from the DCM wrap challenge a couple of weeks back. There is a tutorial here http://www.charmedcardsandcrafts.co.uk/acatalog/louise_brigden_card_tutorial.htm
showing you how to make the Herringbone Fold Pocket Christmas Card.
I decided to have a go at this, as I never got round to the DCM challenge but thought I would make it with a baby theme. I decided to add birth information on the reverse of the tags, as you can see from the picture below
I cut the tags with my good old G & BS cartridge again! I cut 3 sets of tags, 2 normal sets and one with a shadow effect (slightly larger). I stuck a printed tag on one side of the larger tag and a plain one which I stamped with a journalling stamp from Banana Frog on the other side.
In The Water
In the water!
As always a little flexibility is allowed in the theme, it can be in, on or beside water and the water can even be frozen i.e. snow or ice!
Hope the challenge can be this flexible!! The Hanglar image depicts a little boy who has been beside the water fishing - his bucket contains fish, which have been in the water....
I coloured the image with watercolour pencils and used 3d glaze on the fish. I also found the fish button lurking in one of my boxes! I tore and embossed some blue vellum, using the Cuttlebug D'vine Swirls folder and attached it to my card using 3 brads on each side. I added some silver grey ribbon and finally a sentiment from the George & Basic Shapes cartridge.
Friday, 29 August 2008
Sketch Saturday sketch challenge and DT call
I enjoy working with sketches - I usually end up with papers all over the place and losing my tools underneath it all, but thats part of the fun of it!!
The image (Hanna) on the top card was coloured with watercolour pencils. I paper pieced the dress to match in with the base card and strip across the middle, which was embossed with the Cuttlebug Swiss Dots folder.
The Christmas card image (Creative Expressions) was stamped onto acetate with Stazon, and glued and glittered with Art Institute glitter. This was mounted onto gold pearlescent card, that had been embossed with the Cuttlebug Snowflake embossing folder. Gold ribbon was threaded through eyelets on the top left and bottom right corners of the image.
Wednesday, 27 August 2008
Rocking Scalloped Card!
Tuesday, 26 August 2008
A Spoon Full of Sugar challenge - sketch
Monday, 25 August 2008
Hippy Chick
Here is my entry from PTW, which is another of Katharina's great sketches. I love working with them, as it encourages me to use lots of different papers, something I would otherwise probably not do - gets me out of my comfort zone LOL !
CS - Paper Mill, BP - Glamour Prints, Dovecraft, Image - Dimension Fourth, Sentiment - Cuddly Buddly. Image coloured with Gelly Rolls, Marvys and watercolour brush.
Thursday, 21 August 2008
Happy 14th Birthday Nick
He is a very keen Liverpool supporter but I wasn't able to fit all the lettering on his card, so have decided to take some pictures of him on his birthday and do a scrapbook page - don't hold your breath, I have been threatening to start scrapbooking for ages now, just never got round to it!!!!
Stamp - Little Rascals, Creative Expressions, CS - Paper Mill, text from George & Basic Shapes and Beyond Birthdays cricut cartridges, embossed with Swiss Dots cuttlebug folder. Image coloured with Marvys.
Wednesday, 20 August 2008
Spring Fling
Tuesday, 19 August 2008
Spoonful of Sugar + CCT challenge
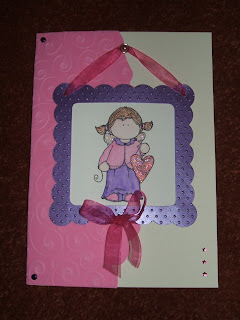
albeit it very last minute. I didn't think I had the right stamps to join in but realised that I could use Hanglar images, so courtesy of a blog candy win from Heidi earlier in the year here is my entry. Image coloured with watercolour pencils and accented with glamour dust. I have spent most of the evening trying out various ideas - lots of them not working !!! I cut the scalloped ? squares using Accent Essentials cricut cartridge, one as a frame, behind which I mounted the image, the other as a blackout shape. After trial and error I punched holes in the top corners with the Big Bite and a ribbon slot at the bottom, in the good old fashioned way - using the hand tool and hammer - not too popular as it was quite late.... may have to invest in a slot punch, often tempted to buy the SU slot punch - perhaps I should put in on the birthday list!!
I embossed some pink vellum using cuttlebug elegant swirls folder and attached that to the left of the base card with brads at the top and bottom and tape behind the scalloped squares, which was attached with good old ds tape. I used a pearl brad to make it look like the picture was hanging.
When the bow is undone the hidden message is revealed - just noticed in this picture that one of the adhesive gems has gone AWOL between pictures, will have a look for it in a minute.
The message was stamped on a smaller scalloped square which was added to the bottom scalloped square. I am really pleased with the way this has turned out - will put it away for someone special's birthday - can't say who as they may look at my blog!!
Just realised this card is suitable for the CCT challenge this week which is 'Soft Furnishings' thanks to the ribbon element!! Hey 2 challenges in one card, not bad for an evenings work....
Monday, 18 August 2008
Cats on Cards with embellishments
Here is my card, image and text from Penny Black, image coloured with watercolour pencils, I used glossy accents on the balloons, pearlescent paper background embossed with swiss dots folder. Images mounted onto CS from Paper Mill, with adhesive gem embellishments in the corners, ribbon from stash.
I am going to use this card for the ABC challenge this week which is 'E for embellishments'.
Sunday, 17 August 2008
Christmas Fairy in the Pink!!
I used the Christmas Fairy stamp, (Funky Kits) and coloured the image with good old watercolour pencils - I keep deliberating about the Prismacolours as everyone seems to be using them lately - but have so far resisted the urge. Backing paper from Dovecraft last year, CS from Paper Mill. The text is from a background text stamp that has lots of Christmassy words on and no doubt it will make an appearance in its entirely on my blog in the near future. :-)
I went to the Paper Mill at Whiteley today to replenish my card stock and was chuffed to find out that they have an offer on Sakura Gelly Roll pens, 3 for 2 if anyone is interested and has a store locally.
Hope to catch up with some more challenges 2moro - watch this space!!
Saturday, 16 August 2008
No patterned paper - eek!!
'This weeks challenge is 'no patterned paper' eek but don't panic too much because this doesn't mean that you can't make your own patterned paper using stamps or doodling or from other resources etc it just means NO shop bought designer patterned paper so go and have fun :)'
Its not very clear but if you enlarge the picture you can just about see the base card has been stamped with a small cup cake image and a greeting 'May your day be sprinkled with FUN!' using a VersaMark ink pad to give a water mark effect. The main image has been coloured using Marvys and Gelly Roll pens, and the icing finished off with a layer of Glossy Accents, then mounted to a scalloped shape cut using Accent Essentials cricut cartridge and embossed using the cuttlebug Elegant Swirls folder.
I am not 100% happy with this card, I think it looks a bit bland and needs a little something - not sure what tho.....
Am off to watch BB, hope to get another challenge done before bed.....
Thursday, 14 August 2008
Scrumdiddlyumptious!!
Here is the card I made for my MIL's birthday this week. Wasn't quite sure what to make so had a root through the mess on my work bench and came up with a stamp (Dimension Fourth) I bought at Newbury, that I haven't used yet, I just love the image of the little mouse asleep in the cup cake case, its soooo cute! I decided to make a cross over? card, not sure if thats the name for this style of card..... I also decided to use some papers I rediscovered recently, that I bought when I first started card making. Image coloured with watercolour pencils, inside of card stamped with small flower and cupcake images using versamark ink pad to give a watercolour effect. The greeting from Cuddly Buddly, mounted onto scalloped shape cut using Accent Essentials cricut cartridge, wording inside from Cuddly Buddly website, printed onto vellum and mounted onto gold pearlescent card.
This card is quite apt for the DCM dare this week, Scrumdiddlyumptious!!
Monday, 11 August 2008
Where did that week go!!
I have combined 2 challenges on this card, the sketch from Papertake Weekly and the Christmas theme from My Time to Craft. I used the Christmas Fairy, coloured the image with watercolour pencils, gelly roll glitter pen and a sprinkling of silver glamour dust, I really must get the gold one, another item on my evergrowing shopping list!
Need to tidy my craft space tomorrow, it is so messy I keep losing things!! Hope to get that sorted and catch up with some challenges.....
Monday, 4 August 2008
Acetate card
Red, Black & White card - MTTC challenge
Sunday, 3 August 2008
I've received an award
Christmas in August!!
The challenge over at PTW this week is to make a Christmas card. Apart from it being quite warm, looking outside it could be winter. Don't know what its like where you are but it has been overcast and drizzling for most of the day today, so have shut myself in my craft room, best place for me as I hate weather like this and can't console myself with chocolate as am trying to diet :-(
I delved into the back of the cupboard for my Christmas box and had creative block for some time, then it came to me...... out came the gorgeous Santa stamp from Creative Expressions, I stamped it onto acetate using Stazon then glued and glittered with Art Institute adhesive and glitter. While that was drying, I dry embossed snowflakes onto white card with the cuttlebug snowflake embossing folder. On a strip of red card I heat embossed the Christmas text (Hampton Art Stamps I think) with gold embossing powder, cut a strip of gold vellum and cut a holly border using a Fiskers border punch. I remember now why I don't use my border punches very often, they keep jamming!! I trimmed 4cm off the right side of the front of a 14cm square red card. I stuck the heat embossed strip and vellum border to the inside of the base card. I stuck Santa onto gold card, rounded the corners and stuck to the white snowflake embossed card and finished with a gold star brad. Red ribbon was stuck down the left side of the white snowflake panel and mounted onto base card.